# SSO Integration With Cyber Crucible Dashboard

# How to Require Users in a Group to Login through SSO

<div id="bkmrk-created-by-mark-weid"><div class="aui-page-panel" id="bkmrk-created-by-mark-weid-1"><div id="bkmrk--2"><div id="bkmrk--3"> </div> </div><div class="view" id="bkmrk-created-by-mark-weid-2"><div class="page-metadata"> Created by <span class="author"> Mark Weideman</span>, last modified on Jul 24, 2025 </div><div class="wiki-content group" id="bkmrk-users-must-have-an-a">Users must have an already existing SSO Integration through Cyber Crucible to require users in a group to sign in using their integrated SSO. For more on how to complete this integration click [here](https://cybercrucible.atlassian.net/wiki/x/AwB5JQ).

First, go to the Groups page found under the Administration tab in the sidebar.

Then locate the “Require User Login through SSO“ column on the grid and click to turn the toggle on for the desired group

<span class="confluence-embedded-file-wrapper image-center-wrapper confluence-embedded-manual-size">![Require SSO Toggle Off.png](/attachments/516)</span>After turning the toggle on the toggle will look like this:

<span class="confluence-embedded-file-wrapper image-center-wrapper confluence-embedded-manual-size">![Require SSO Toggle On.png](/attachments/518)</span>Now with the toggle turned on to require users in the group to login through their Integrated SSO, users in this group will not be able to login normally through the [dashboard.cybercrucible.com](http://dashboard.cybercrucible.com) domain, they will be required to go to the custom domain setup during the Integration and login through their SSO.

</div> </div> </div><div id="bkmrk--4"> </div></div>

# Microsoft SSO Integration With Cyber Crucible Dashboard

<div id="bkmrk-created-by-mark-weid"><div class="aui-page-panel" id="bkmrk-created-by-mark-weid-1"><div id="bkmrk--2"><div id="bkmrk--3"> </div> </div><div class="view" id="bkmrk-created-by-mark-weid-2"><div class="page-metadata"> Created by <span class="author"> Mark Weideman</span>, last modified on Jun 19, 2025 </div><div class="wiki-content group" id="bkmrk-clients-can-integrat">Clients can integrate their Microsoft Entra ID (Azure AD) SSO with the Cyber Crucible dashboard by following these steps below:

1. Client updates in the Entra ID SAML config
    
    
    1. First, go to Enterprise applications and click the desired app
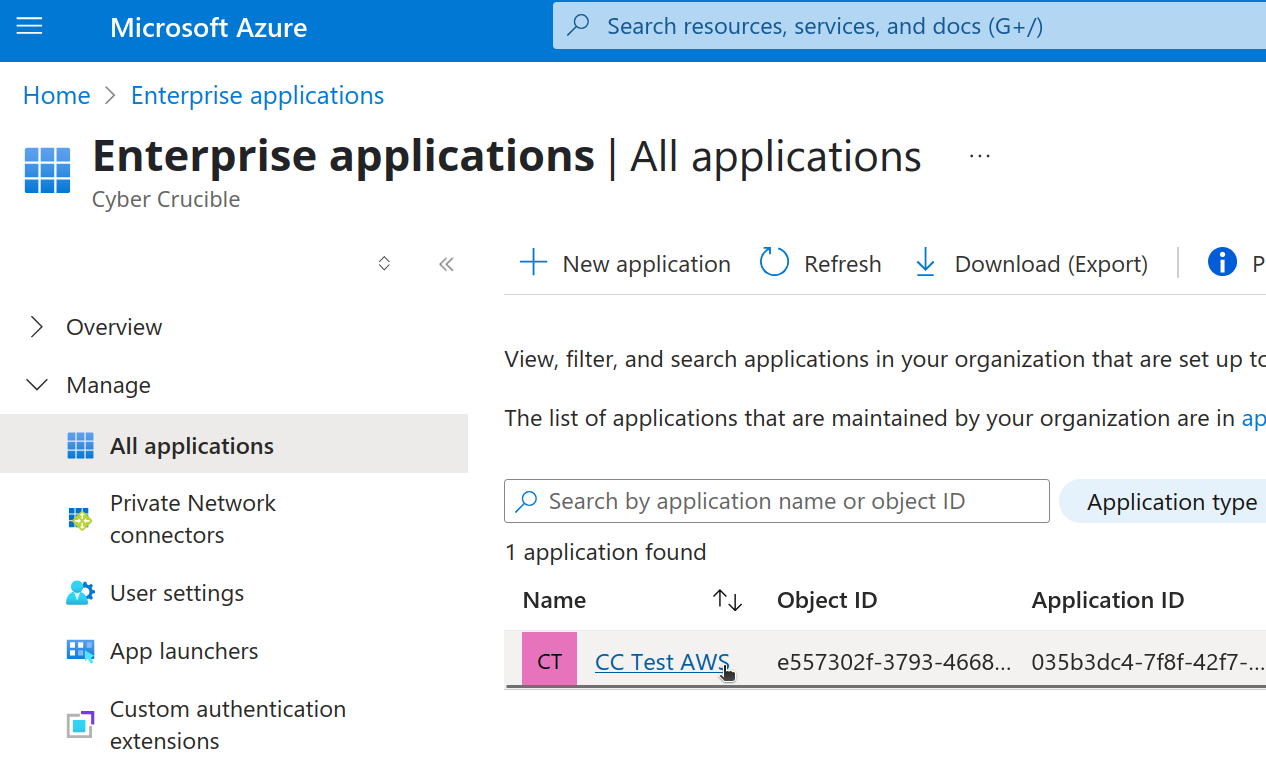
        
        <span class="confluence-embedded-file-wrapper image-center-wrapper confluence-embedded-manual-size">![Screenshot from 2025-06-18 17-20-40.png](/attachments/512)</span>
        1. If you do not have one yet, then click create New application inside the Enterprise applications section.
            
            
            1. Enter your app name and click the “(Preview) Integrate any other application you don't find in the gallery (Non-gallery)” setting for the “What are you looking to do with your application?” field
    2. Edit the Basic SAML Configuration in the enterprise app, do this by clicking the Single sign-on setting under Manage and click edit in the Basic SAML Configuration section
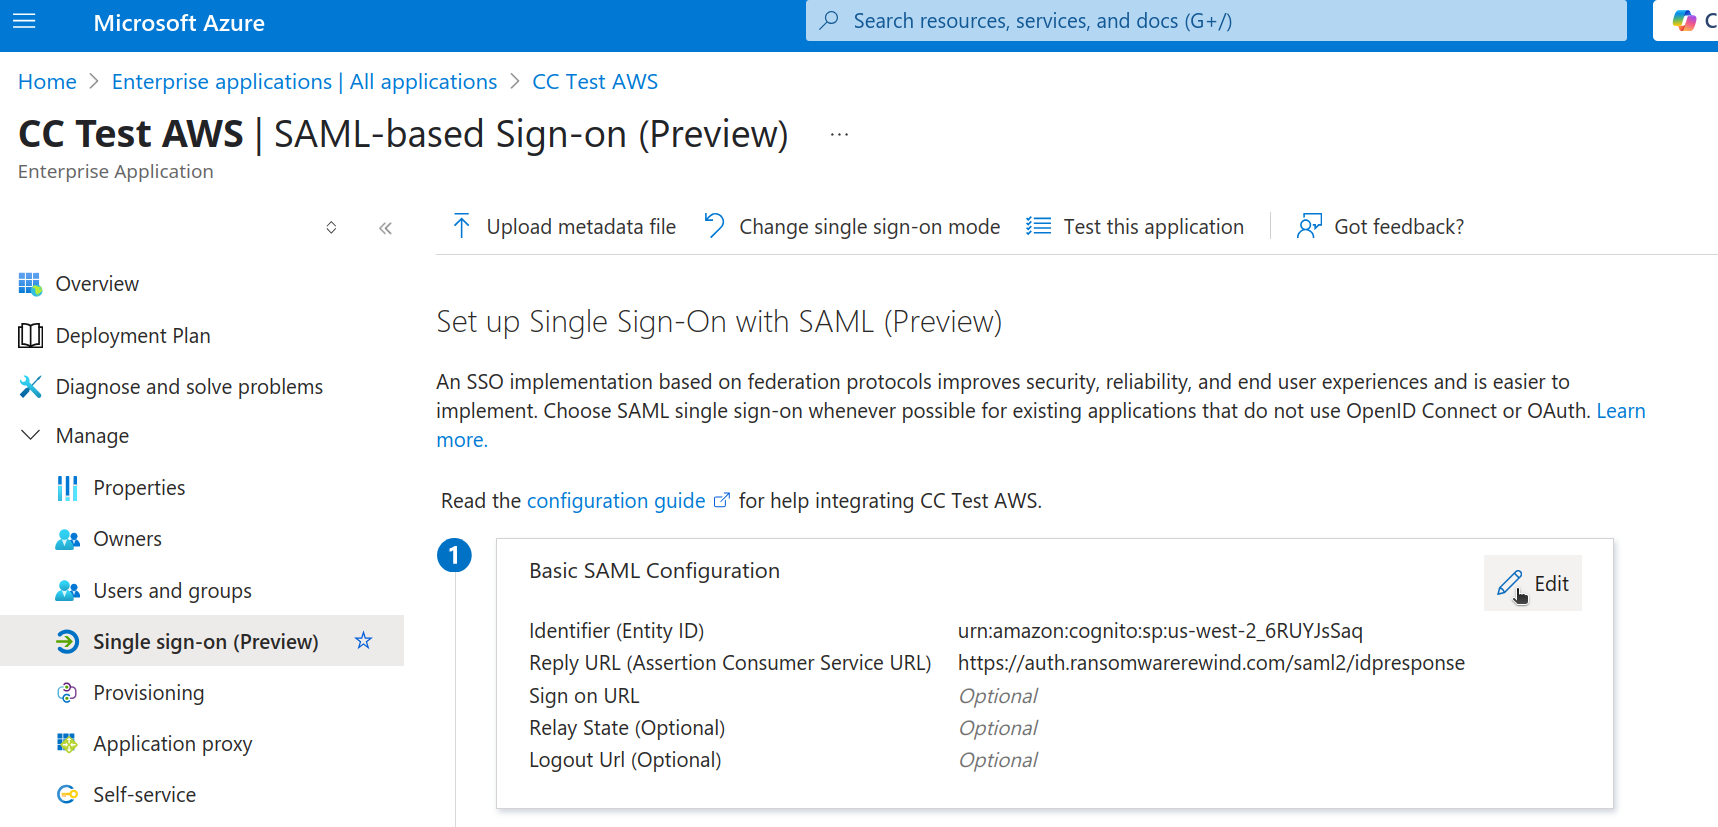
        
        <span class="confluence-embedded-file-wrapper image-center-wrapper confluence-embedded-manual-size">![Screenshot from 2025-06-18 17-22-11.png](/attachments/513)</span>
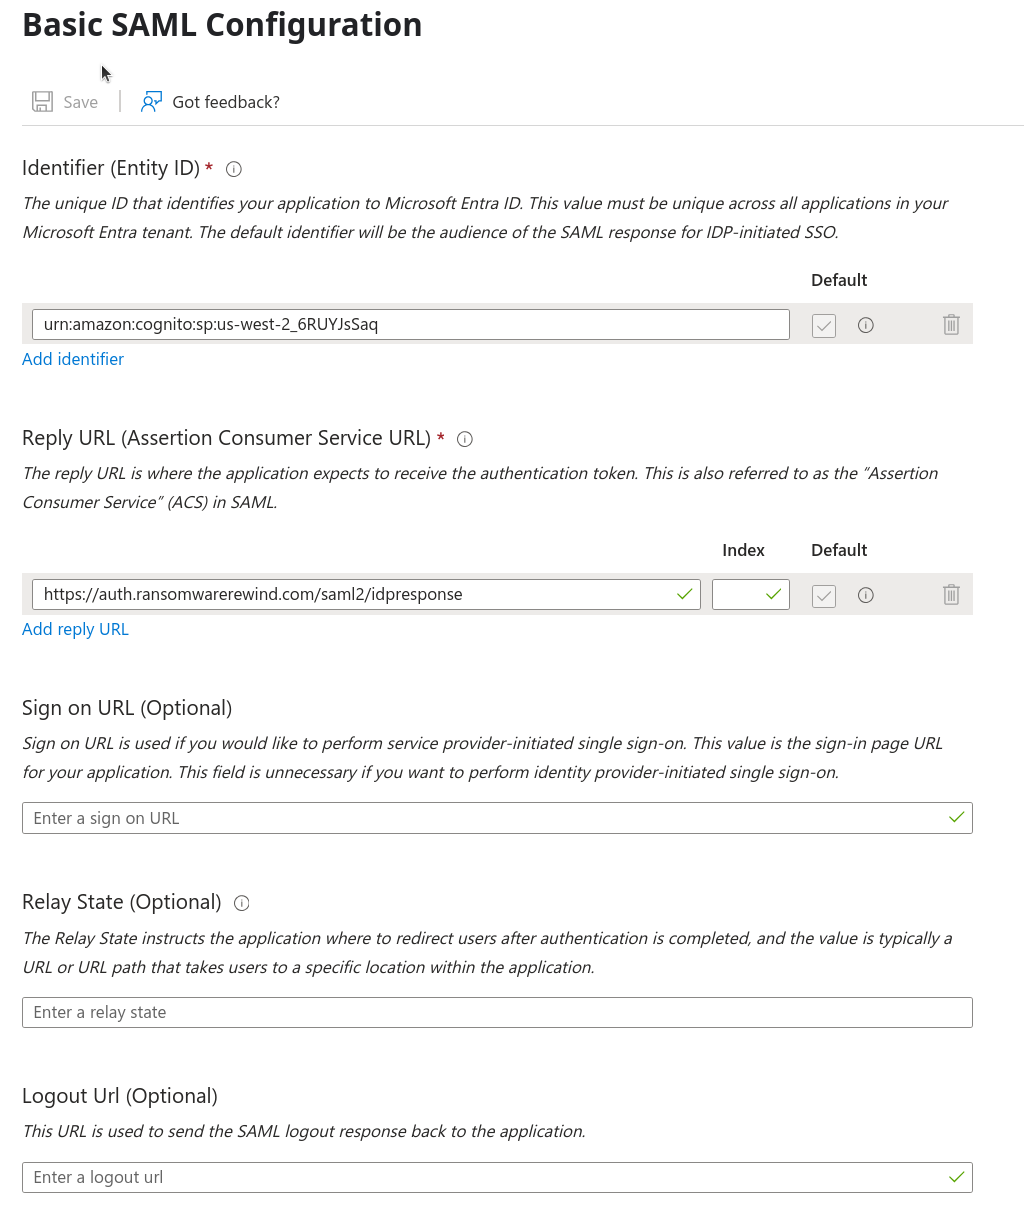
        1. In the “Identifier (Entity ID)” field, enter ‘urn:amazon:cognito:sp:us-west-2\_6RUYJsSaq’
        2. In the “Reply URL (Assertion Consumer Service URL)” field, enter “[https://auth.ransomwarerewind.com/saml2/idpresponse](https://auth.ransomwarerewind.com/saml2/idpresponse)”
        3. The config should look like this:
        4. <span class="confluence-embedded-file-wrapper image-center-wrapper confluence-embedded-manual-size">![image-20250618-212708.png](/attachments/509)</span>
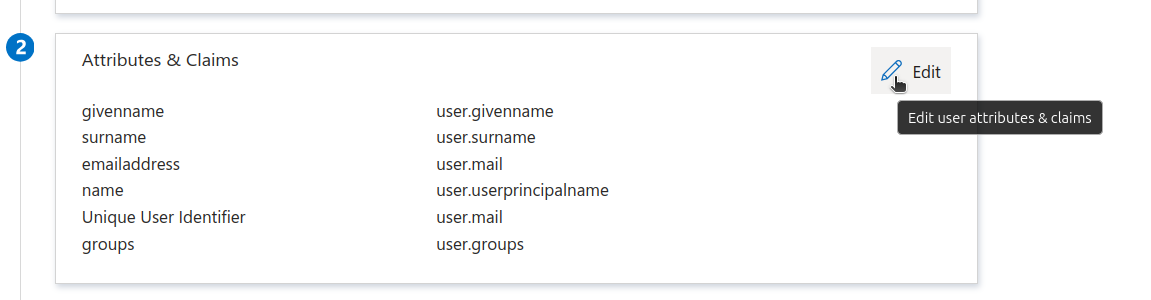
    3. After saving the Basic SAML Config, click Edit in the Attributes &amp; Claims Section
        
        <span class="confluence-embedded-file-wrapper image-center-wrapper confluence-embedded-manual-size">![Screenshot from 2025-06-18 17-30-24.png](/attachments/508)</span>
        1. THIS NEXT STEP IS REQUIRED
            
            
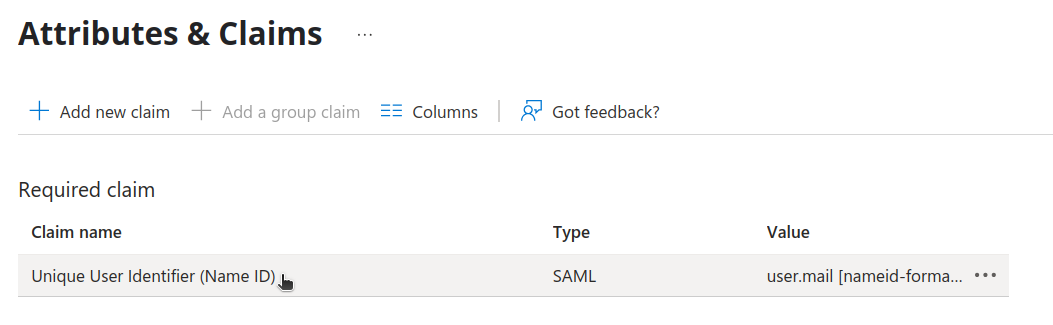
            1. Click the Required claim titled “Unique User Identifier (Name ID)” to edit it
                
                <span class="confluence-embedded-file-wrapper image-center-wrapper confluence-embedded-manual-size">![Screenshot from 2025-06-18 17-36-56.png](/attachments/507)</span>
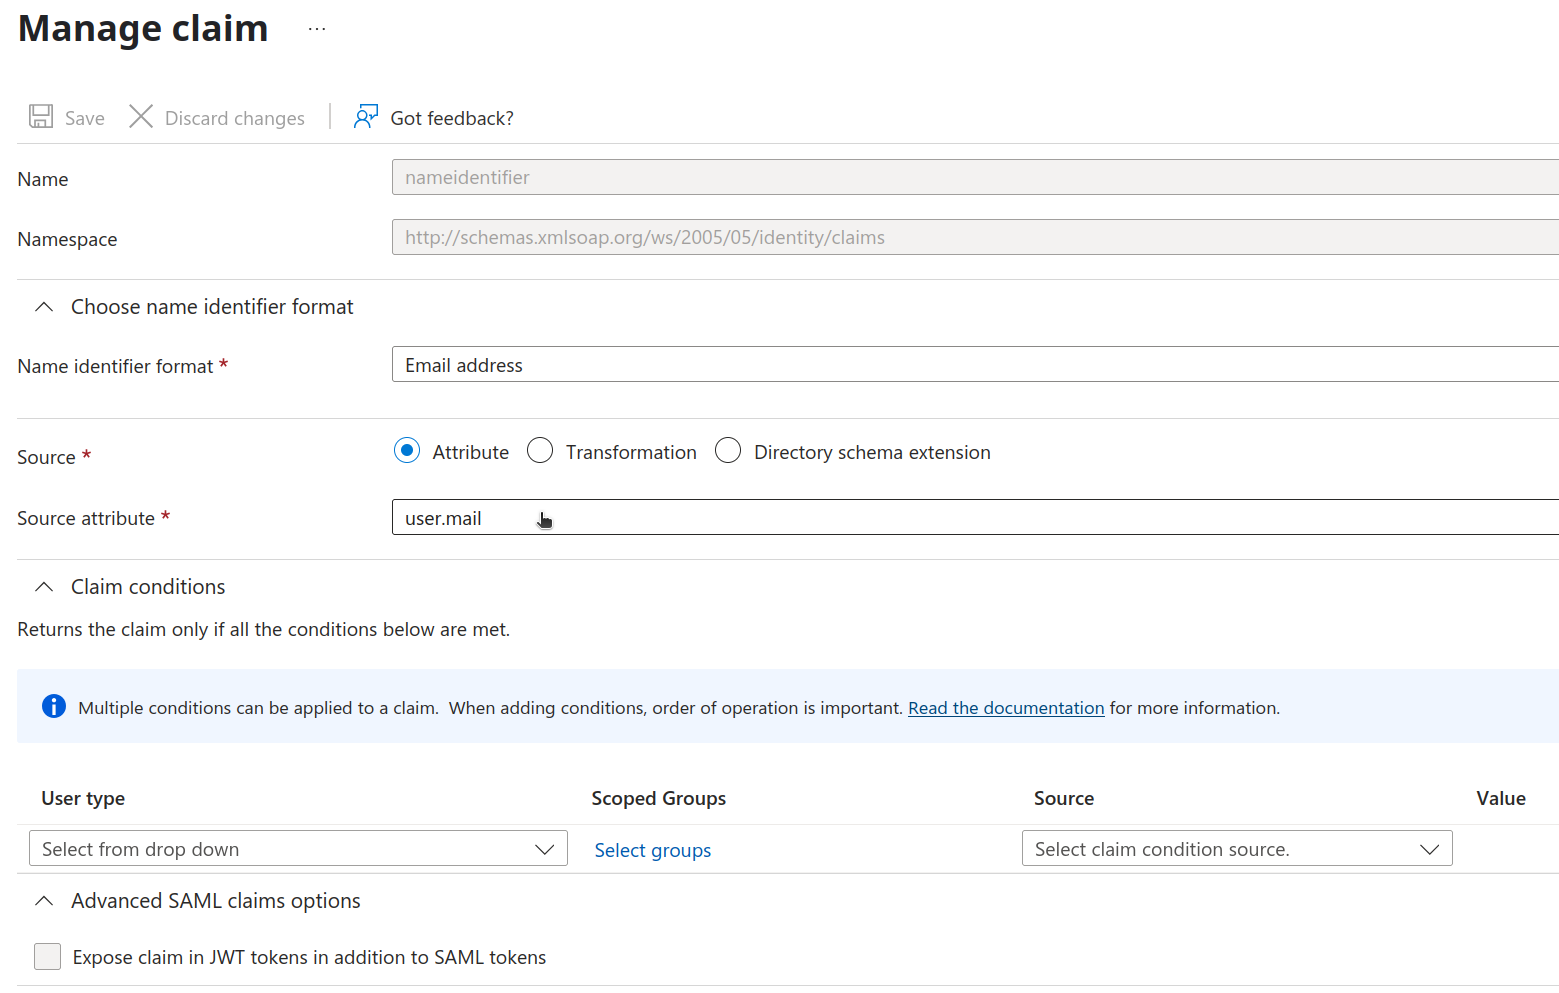
            2. Then edit and save the claim as follows
                
                
                1. The Name identifier format should be Email address
                2. The Source attribute should be “user.mail”
                3. This field will be the identifier in the access tokens we see in the rest server
                    
                    <span class="confluence-embedded-file-wrapper image-center-wrapper confluence-embedded-manual-size">![Screenshot from 2025-06-18 23-47-07.png](/attachments/496)</span>
2. Get in contact with Cyber Crucible to pass information over as this information is needed for Cyber Crucible’s updates in AWS Cognito. We will need the following information
    
    
    1. The “App Federation Metadata Url” value under the SAML Certificates section in the clients Entra ID Enterprise App
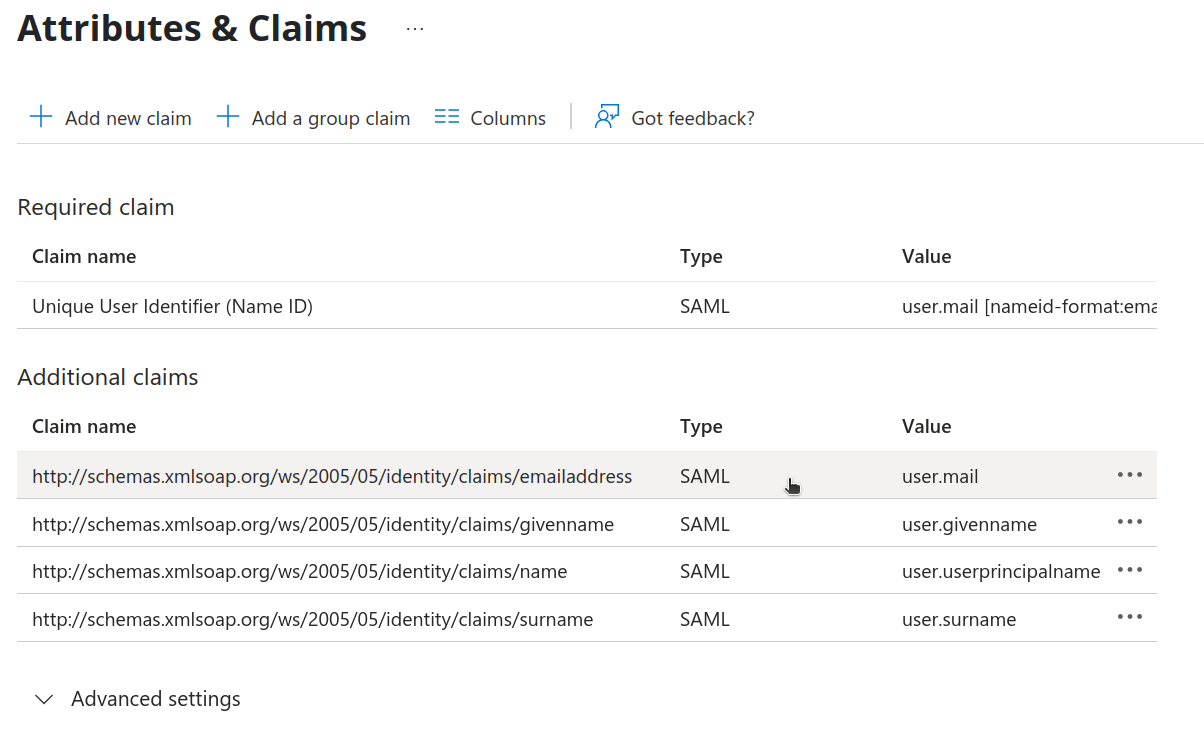
    2. Clients should go to the “Attributes &amp; Claims” section on the Single sign-on settings. Under the Additional claims section we need the schemas found in the Claim name section
        
        
        1. <span class="confluence-embedded-file-wrapper image-center-wrapper confluence-embedded-manual-size">![Screenshot from 2025-06-18 23-49-29.png](/attachments/495)</span>
3. Cyber Crucible will make a new domain for users to use in order to login to the dashboard using the SSO setup above

 </div> </div> </div><div id="bkmrk--4"> </div></div>